Using an LDR as a switch on the Raspberry Pi's GPIO Pins
The goal of this guide is to connect an LDR to the Raspberry Pi GPIO's and reading its state in a loop. This results in a light dependent switch.
Introduction
This hands on will guide you through the process of attaching an LDR (Light Dependent Resistor) to a GPIO of the Raspberry Pi and reading its state via a small Python script.
In addition to your Raspberry Pi running Raspbian, you will also need:
- A Breadboard
- An LDR
- A 1k resistor
- a 10k resistor
- a 220 ohm resistor
- any general purpose NPN transistor such as a BC547
- three male-female jumper wires
- three or four male-male jumper wires
Most of this can be found in the Arduino Starter Kit provided. The jumper wires can be found in a separate box provided by the lector.
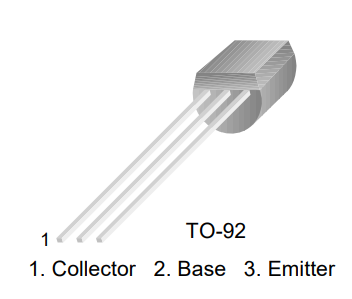
Always consult the datasheet of components that have multiple pins or polarities as not to connect any of the terminals to the wrong connections. The most critical part here is the NPN transistor. The connections are shown below and were found in the datasheet.
An LDR is a component that has a (variable) resistance that changes with the light intensity that falls upon it. This allows them to be used in light sensing circuits. The Raspberry Pi has no analogue to digital converter (ADC) on board so we actually cannot read in the actual resistance value.
Hardware Schematic and BreadBoard
The best way to read an LDR state (ON or OFF) is by using a transistor as a comparator as shown in the schematic below.
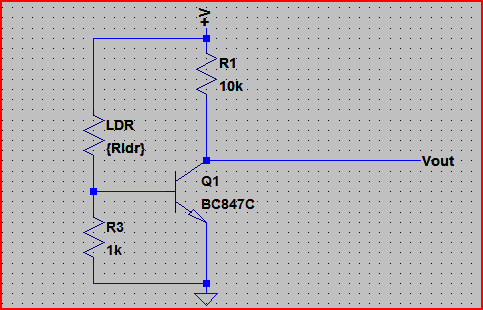
It uses the LDR as the upper part of a voltage divider. When the LDR resistance drops, the voltage at the transistor base rises and turns it on. The transistor can be any general purpose NPN.
The first part of this circuit is the LDR and the base resistor. Together they work as a voltage divider. When the light is off, the LDR resistance is very high and then the voltage that goes to the base of the transistor is very low, making the GPIO pin go HIGH.
When the light is on, the LDR resistance is very low and the voltage going to the base of the transistor is enough to activate the circuit and make the GPIO pin go LOW since the current will flow to the path of less resistance, which is to the GND.
We can calculate the resistor value based on whereabouts we want the turn on to happen.
Let's say the LDR resistances goes from 200Ω (light) to 10kΩ (dark). We want the transistor to turn on when the LDR is at 5kΩ. The supply (Vcc) is at 3.3V. A typical NPN transistor turns on at around 0.7V, so if we do:
5,000 * (0.7 / 3.3) = 1060Ω needed for the base resistor. We can pick a 1kΩ resistor since it's near enough.
Deciding what GPIO pin to use is not always easy. You need to make sure you are connecting to an already used pin or to a pin with a special function. A website such as https://pinout.xyz/ can be a nice aid.
Available GPIO pins are: GPIO18, GPIO23, GPIO24, GPIO25, GPIO12, GPIO16, GPIO17, GPIO27, GPIO22, GPIO5, GPIO6, GPIO26.
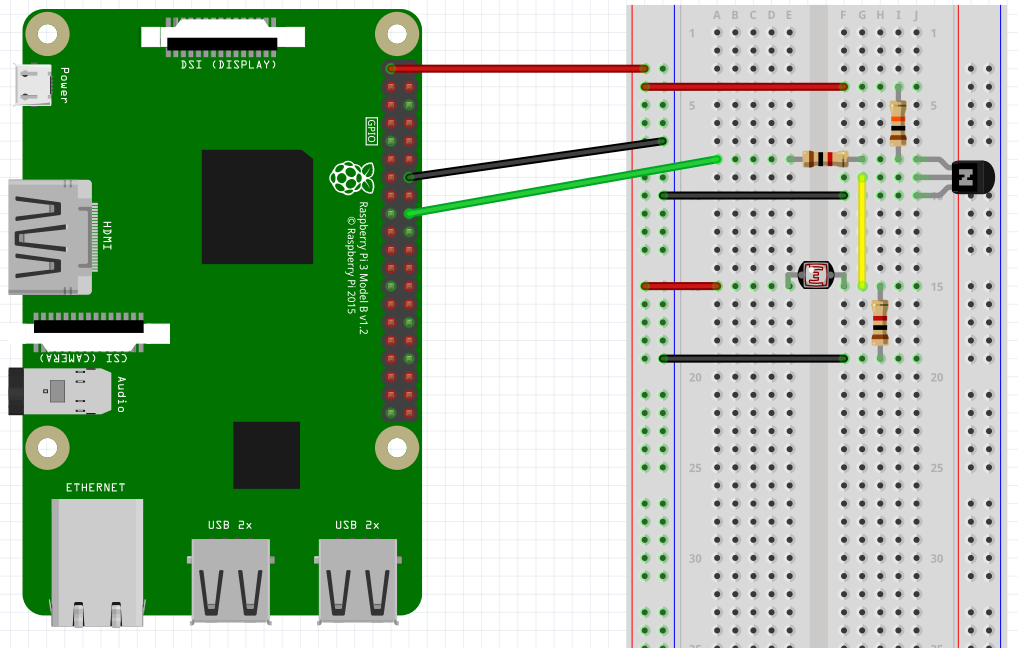
Here we make use of GPIO24 to connect output of our comparator.
Connecting everything correctly should show a similar result to the image shown below.
Example program
A small example program that read's the state of the GPIO pin is shown below. Notice how again a class was made of the LDR.
import wiringpi

class LDR(object):
  def __init__(self):
    self.pinNumber = 24
    wiringpi.wiringPiSetupGpio()    # Use GPIO numbering
    wiringpi.pinMode(self.pinNumber, 0)        # Set LDR pin to 0 ( INPUT )

  def get_state(self):
    return wiringpi.digitalRead(self.pinNumber)


# Create an object of LDR
switch = LDR()

# Get the state of the LDR
print("State = " + str(switch.get_state()))

print("Done")
Save this program in a python file called for example ldr_hw.py. Execute it to verify that your hardware is working properly.
Challenge
Alter the previous program to read the state of the LDR in a endless loop. Do make sure to add a delay between reading the state using the sleep() function of python.
You will need to import the sleep function to introduce a delay in your code:
from time import sleep

# ....

sleep(1)      # Sleep (seconds)
The full solution can be found in the solutions section.