Interacting with the User
Interacting with a user on an Android device typically happens through the Graphical User Interface (GUI) of your app. While apps exist that have no user interface (such as services), they are not the main focus of this course.
A whole course could be spend on the different GUI components available to build the most awesome apps. This is however not the intention of this course. Most of the graphical aspects will be left to the reader to find out how they can be styled and changed to your needs. This course will focus on the programmatic aspects of building an Android app.
This chapter will give an introduction into graphical components and how to interact with them from your Java code.
Activities
The Activity class serves as the entry point for an app's interaction with the user, providing the window in which the app draws its UI. This window typically fills the screen, but may be smaller than the screen and float on top of other windows. You implement an activity as a subclass of the Activity class. Generally, one activity implements one screen in an app. For instance, one of an app's activities may implement the Preferences screen, while another activity implements the Compose Email screen.
Most apps contain multiple screens, which means they comprise multiple activities. Typically, one activity in an app is specified as the main activity, which is the first screen to appear when the user launches the app. Each activity can then start another activity in order to perform different actions.
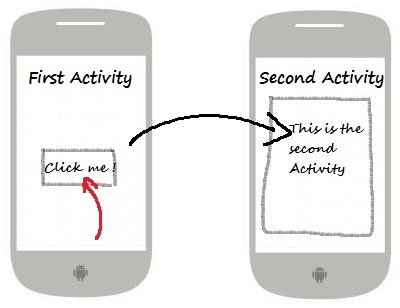
For example, the main activity in a simple e-mail app may provide the screen that shows an e-mail inbox. From there, the main activity might launch other activities that provide screens for tasks like writing e-mails and opening individual e-mails.
Although activities work together to form a cohesive user experience in an app, each activity is only loosely bound to the other activities; there are usually minimal dependencies among the activities in an app. In fact, activities often start up activities belonging to other apps. For example, a browser app might launch the Share activity of a social-media app.
To use activities in your app, you must register information about them in the app's manifest, and you must manage activity lifecycles appropriately. Skillfully managing activities allows you to ensure that, for example:
- Orientation changes take place smoothly without disrupting the user experience.
- User data is not lost during activity transitions.
- The system kills processes when it's appropriate to do so.
This course will return on these topics later.
The Java code behind your main activity can be found under app > java > be.vives.<yourname>.hello_world > MainActivity.java. Some boilerplate code has already been prepared for you.
// ...
public class MainActivity extends AppCompatActivity {

    @Override
    protected void onCreate(Bundle savedInstanceState) {
        super.onCreate(savedInstanceState);
        setContentView(R.layout.activity_main);
        // ...
    }
    // ...
}
The two most important lines of code for now are the ones shown. They are responsible for loading the your layout at the moment that the activity is started.
Views and ViewGroups
The user interface for an Android activity is built using a hierarchy of layouts (ViewGroup objects) and widgets (View objects). Layouts are invisible containers that control how its child views are positioned on the screen. Widgets are UI components such as buttons and text boxes.
![Hierarchy of Views and ViewGroups[^1]](img/viewgroup_2x.png) 1: Source: https://developer.android.com/training/basics/firstapp/building-ui.html
1: Source: https://developer.android.com/training/basics/firstapp/building-ui.html
Android provides an XML vocabulary for ViewGroup and View classes, so most of your UI is defined in XML files. However, instead of teaching you to write some XML, we'll be using the drag-and-drop layout editor of Android Studio to build a simple GUI.
As stated before the actual layout file for the main activity can be found at app > res > layout > content_main.xml. Notice at the bottom left corner of the editor you can switch between Design and Text. This allows you to switch between drag-and-drop and XML editing.
The Component Tree window on the bottom-left side shows the layout's hierarchy of views. In this case, the root view is a ConstraintLayout, containing just one TextView object.
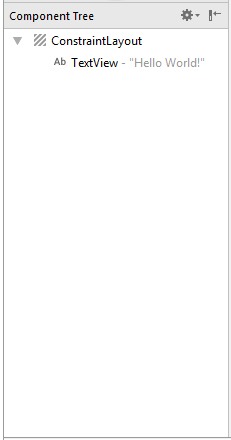
ConstraintLayout is a layout container that defines the position for each view based on constraints to sibling views (views on the same hierarchy level - brother and sister components as it were) and the parent layout. In this way, you can create both simple and complex layouts with a flat view hierarchy. That is, it avoids the need for nested layouts (a layout inside a layout), which can increase the time required to draw the UI.
![Two views positioned inside ConstraintLayout[^2]](img/constraint-example_2x.png) 2: Source: https://developer.android.com/training/basics/firstapp/building-ui.html
2: Source: https://developer.android.com/training/basics/firstapp/building-ui.html
Building a Basic Input Form
Try building a basic input form using TextView, EditText and Button components like shown below. Experiment a bit with the different options of the drag-and-drop editor. For some tips on using the anchors you can take a look at https://developer.android.com/training/basics/firstapp/building-ui.html#textbox or https://medium.com/exploring-android/exploring-the-new-android-constraintlayout-eed37fe8d8f1.

Try to build it component per component. Not all at once. The first time you will need to start the application via Run => Run 'app' but after changing a little bit you can just apply the changes using Run => Apply Changes. This is much faster.
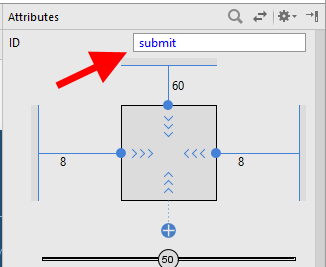
While not critical for the workings of your application, it is good practice and a good idea to give all your Views a decent name. This is achieved by setting the ID attribute.
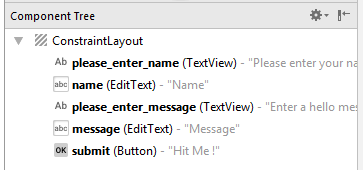
The component tree could look a bit like the one shown below.
The attributes pane shows the basic properties of a View. However most views have a lot more attributes that can be changed. These can be accessed by clicking View all attributes at the bottom left corner of the attributes pane or by click the small two-arrow icon at the top right corner.
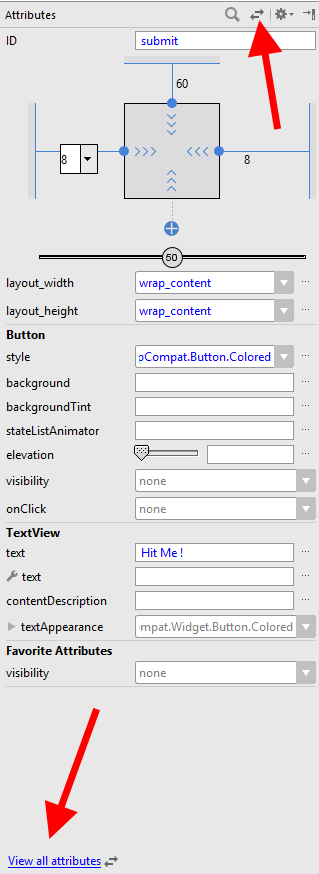
Many views have padding and margin you can play around with to change the appearance of the controls. For example for the button padding_horizontal was set to 32dp and padding_vertical was set to 16dp.
Absolute and Relative Sizing
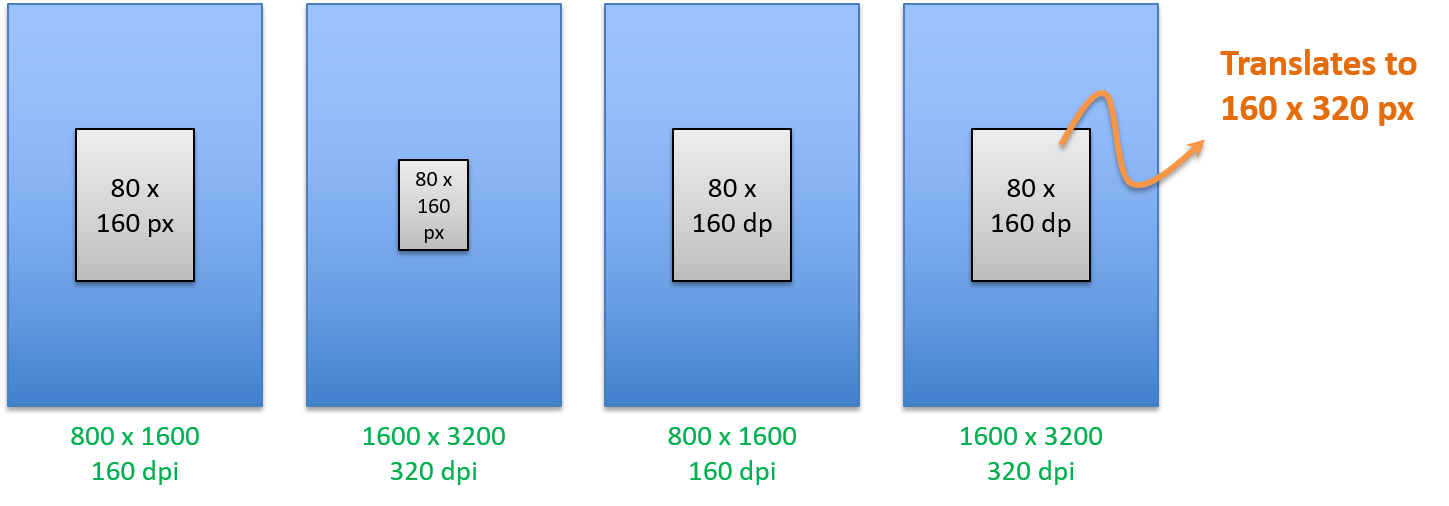
In general, specifying a layout width and height using absolute units such as pixels is not recommended. Instead, using relative measurements such as density-independent pixel units (dp), wrap_content, or match_parent, is a better approach, because it helps ensure that your application will display properly across a variety of device screen sizes.
SP and DP define two different units used in android for defining layout properties like margins, text size, etc. SP stands for scale-independent pixels, and DP is density-independent pixels. SP and DP are quiet the same, except that SP has an additional scaling factor based on the user’s preferred text size. SP must be used for defining text sizes but not for layout sizes.
SP and DP fall into the category of android relative units. These units are used in creation of user interfaces in XML and programmatically implemented in code. DP stands for density independent pixels whereas SP stands for Scale independent pixels.
DP is an abstract or virtual unit which is based on the physical density of the screen. One DP means one pixel on a 160 dpi screen. Increase in the screen resolution will also increase the number of pixels represented in 1 unit of DP. Similarly, for lower resolution, this number of pixels represented in one unit of dp will decrease. It is a relative unit and therefore baseline of 160 dpi (dots per inch) screen has been selected.
SP is similar to the DP unit but additionally it is also scaled according to the font size preference of the user. SP is important as it provides a link between the users chosen text and the text in the application. A user can increase or decrease the size of text according to his own requirement. These SP or scaled pixels take care of this issue.
Some absolute units include mm (millimeter), in (inches), pt (points) and px (pixels). These should all be avoided as they will not scale between different devices and screen sizes.
Event Handling
Events are a useful way to collect data about a user's interaction with interactive components of an app. Events in Android can take a variety of different forms, but are usually generated in response to an external action. The most common form of events, particularly for devices such as tablets and smartphones, involve some form of interaction with the touch screen. Such events fall into the category of input events.
The Android framework maintains an event queue into which events are placed as they occur. Events are then removed from the queue on a first-in, first-out (FIFO) basis. In the case of an input event such as a touch on the screen, the event is passed to the view positioned at the location on the screen where the touch took place. In addition to the event notification, the view is also passed a range of information (depending on the event type) about the nature of the event such as the coordinates of the point of contact between the user’s fingertip and the screen.
In order to be able to handle the event that it has been passed, the view must have in place an event listener. The Android View class, from which all user interface components are derived, contains a range of event listener interfaces, each of which contains an abstract declaration for a callback method. In order to be able to respond to an event of a particular type, a view must register the appropriate event listener and implement the corresponding callback.
For example, if a button is to respond to a click event (the equivalent to the user touching and releasing the button view as though clicking on a physical button) it must both register the View.onClickListener event listener (via a call to the target view’s setOnClickListener() method) and implement the corresponding onClick() callback method. In the event that a "click" event is detected on the screen at the location of the button view, the Android framework will call the onClick() method of that view when that event is removed from the event queue. It is, of course, within the implementation of the onClick() callback method that any tasks should be performed or other methods called in response to the button click.
The next section will take a look at how to set the event handler via a button's onClick attribute. Later in this course we will explore other and better options.
Using the android:onClick Resource
Before exploring event listeners in more detail it is worth noting that a shortcut is available when all that is required is for a callback method to be called when a user "clicks" on a button view in the user interface.
Consider our user input form containing a button view named submit with the requirement that when the user touches the button, a method called onSubmitClick() declared in the activity class is called. All that is required to implement this behavior is to write the onSubmitClick() method (which takes as an argument a reference to the view that triggered the click event).
Let's for example place this code inside of our main activity to handle the event of the submit button.
public void onSubmitClick(View button) {
    Snackbar.make(button, "Submit button is clicked", Snackbar.LENGTH_LONG)
            .setAction("Action", null).show();
}
The code above is partly copied from the boilerplate code that was generated. It creates a message similar to the one shown when you click the little envelope.
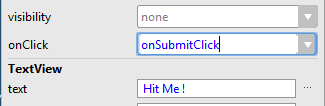
Next the method name has to be passed to the button component via the onClick attribute as shown below:
Using this method imposes a performance penalty since the framework has to use reflection to call your class's method. Gingerbread and above should be fine (better jit) but before that the difference was noticeable.
Another drawback is that the xml method is less maintainable as it puts "code things" (method names) inside the presentation layer. Untangling which handler is set where requires diligent comments, which developers all too often forget to add.
Getting Information out of Views
While the above handler is a big step forward, we do want to display a more personal message to the user. For this we will need to acquire the text that the user typed inside the EditText views, such as his name and message.
While in Java (with Swing or JavaFX) our visual components where actual attributes of our classes. This means we had something like this at the top of our class code:
public class HelloWorld {
  private TextField name;
  private TextField message;

  public HelloWorld() {
    name = new TextField();
    message = new TextField();
  }
}
We don't see that anywhere in our current Java code here. That is because this is all done in the background when our activity is launched through the content of the XML file. Because of this the created components are not directly accessible (they are created at run-time).
The only way to access the visual components is by using some sort of indexing mechanism based on the ID's of the components. We can actually ask an Activity to search for a component with a specific ID. If found the method will return a object of type T which can then be casted to an object of the type we were searching for. If none is found, null is returned.
By using the public id listing of the R class we can make sure that we only request existing components. This allows us to omit the not-null check.
Info: R.java
R.java is the dynamically generated class, created during the build process to dynamically identify all assets (from strings to android widgets to layouts), for usage in java classes in Android app. Note this R.java is Android specific, so it doesn't have much to do with Java language constructs.
This comes all together in the code shown below. Take a good look at the casting of the return object and the places of the parentheses.
public void onSubmitClick(View button) {
    String username = ((EditText)findViewById(R.id.name)).getText().toString();
    String message = ((EditText)findViewById(R.id.message)).getText().toString();

    Snackbar.make(button, username + " says " + message, Snackbar.LENGTH_LONG)
            .setAction("Action", null).show();
}