Activities
Activities are one of the fundamental building blocks of apps on the Android platform. An activity is the entry point for interacting with the user. It represents a single screen with a user interface. For example, an email app might have one activity that shows a list of new emails, another activity to compose an email, and another activity for reading emails. Although the activities work together to form a cohesive user experience in the email app, each one is independent of the others. As such, a different app can start any one of these activities if the email app allows it. For example, a camera app can start the activity in the email app that composes new mail to allow the user to share a picture.
An activity facilitates the following key interactions between the system and the app:
- Keeping track of what the user currently cares about (what is on screen) to ensure that the system keeps running the process that is hosting the activity.
- Knowing that previously used processes contain things the user may return to (stopped activities), and thus more highly prioritize keeping those processes around.
- Helping the app handle having its process killed so the user can return to activities with their previous state restored.
- Providing a way for apps to implement user flows between each other, and for the system to coordinate these flows. (The most classic example here being share.)
You implement your own activities as subclasses of the Activity class.
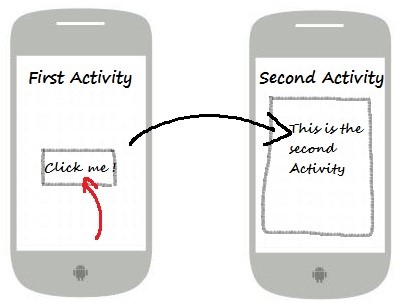
Most apps contain multiple screens, which means they comprise multiple activities. Typically, one activity in an app is specified as the main activity, which is the first screen to appear when the user launches the app. Each activity can then start another activity in order to perform different actions.
To use activities in your app, you must register information about them in the app's manifest, and you must manage activity lifecycles appropriately. The former is automatically added by Android Studio. An example of a main activity is shown below in the XML partial.
<activity
    android:name=".MainActivity"
    android:label="@string/app_name"
    android:theme="@style/AppTheme.NoActionBar">
    ...
</activity>
The only required attribute for this element is android:name, which specifies the class name of the activity. You can also add attributes that define activity characteristics such as android:label, android:icon, or android:theme.
The name of the class that implements the activity, a subclass of Activity, should have a name that is a fully qualified class name (such as, be.vives.nico.hello_world.MainActivity). However, as a shorthand, if the first character of the name is a period (for example, .MainActivity), it is appended to the package name specified in the <manifest> tag.
Notice the @string/app_name reference. This mechanism allows us to put ALL strings inside an XML file which can be found in res/values/strings.xml.
It allows us to bundle all strings used inside the application inside a single file. This has a couple of advantages:
- Easy to change and reuse text
- Faster and easier to translate application
<resources>
    <string name="app_name">HelloWorldInAndroid</string>
    <string name="action_settings">Settings</string>
    <string name="title_activity_about">AboutActivity</string>
</resources>
Creating New Activities
In Android Studio all you need to do to create a new activity is navigating to File => New => Activity => Gallery. Choose one of the templates and give the activity a name. For the moment you can choose the "Empty Activity" or "Blank Activity". Make sure to always add the suffix Activity to the name of the activity. For example AboutActivity.
When creating a new activity most of the start code is generated by the IDE.
package be.vives.nico.hello_world.helloworldinandroid;

import android.os.Bundle;
//...

public class MainActivity extends AppCompatActivity {

    @Override
    protected void onCreate(Bundle savedInstanceState) {
      super.onCreate(savedInstanceState);
      setContentView(R.layout.activity_main);
      Toolbar toolbar = (Toolbar) findViewById(R.id.toolbar);
      setSupportActionBar(toolbar);

        FloatingActionButton fab = (FloatingActionButton) findViewById(R.id.fab);
        fab.setOnClickListener(new View.OnClickListener() {
            @Override
            public void onClick(View view) {
                Snackbar.make(view, "Replace with your own action", Snackbar.LENGTH_LONG)
                        .setAction("Action", null).show();
            }
        });
    }
    //...
}
Almost all activities interact with the user, so the Activity class takes care of creating a window for you in which you can place your UI with setContentView(View). The activity loads its UI component from the XML layout files.
The Layout can be found as two files inside res/layout
content_main.xml, which contains the actual layout we want to display to the useractivity_main.xml, which acts a container for the content and some other things like a toolbar. It also defines the general layout of the activity

Lifecycle of an Activity
As a user navigates through, out of, and back to your app, the Activity instances in your app transition through different states in their lifecycle. The Activity class provides a number of callbacks that allow the activity to know that a state has changed: that the system is creating, stopping, or resuming an activity, or destroying the process in which the activity resides.
Within the lifecycle callback methods, you can declare how your activity behaves when the user leaves and re-enters the activity. For example, if you're building a streaming video player, you might pause the video and terminate the network connection when the user switches to another app. When the user returns, you can reconnect to the network and allow the user to resume the video from the same spot. In other words, each callback allows you to perform specific work that's appropriate to a given change of state. Doing the right work at the right time and handling transitions properly makes your app more robust and performant. For example, good implementation of the lifecycle callbacks can help ensure that your app avoids:
- Crashing if the user receives a phone call or switches to another app while using your app.
- Consuming valuable system resources when the user is not actively using it.
- Losing the user's progress if they leave your app and return to it at a later time.
- Crashing or losing the user's progress when the screen rotates between landscape and portrait orientation.
Activity Stack
Activities in the system are managed as an activity stack. When a new activity is started, it is placed on the top of the stack and becomes the running activity. The previous activity remains below it in the stack. It will not come to the foreground again until the new activity exits.
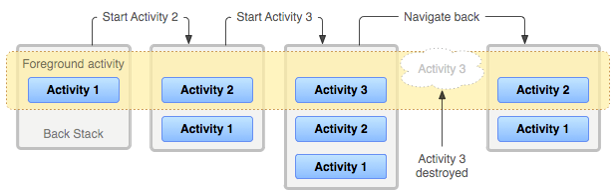
When you press the back button the current activity is destroyed. The stack's top activity is then shown.
LifeCycle of an Activity
An activity has essentially four states.
- If an activity in the foreground of the screen (at the top of the stack), it is active or running ("Activity 1" in the example below is running / alive).
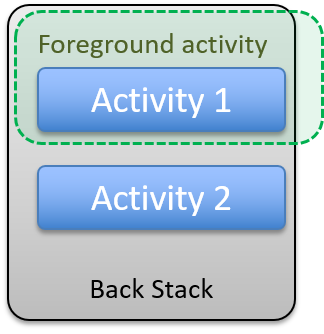
If an activity has lost focus but is still visible (that is, a new non-full-sized or transparent activity has focus on top of your activity), it is paused.
- A paused activity is completely alive (it maintains all state and member information and remains attached to the window manager)
- However it can be killed by the system in extreme low memory situations.
Figure: Paused Activity If an activity is completely obscured by another activity, it is stopped ("Activity 2" in the example below is stopped).
- It still retains all state and member information, however, it is no longer visible to the user so its window is hidden and it can be killed by the system when memory is needed elsewhere.
If an activity is paused or stopped, the system can drop the activity from memory by either asking it to finish, or simply killing its process. When it is displayed again to the user, it must be completely restarted and restored to its previous state. It is your task as a programmer to save the state of the activity before it is killed. Android provides callback methods which can be used for this purpose
The Activity class is a crucial component of an Android app, and the way activities are launched and put together is a fundamental part of the platform's application model. Unlike programming paradigms in which apps are launched with a main() method, the Android system initiates code in an Activity instance by invoking specific callback methods that correspond to specific stages of its lifecycle.

The square rectangles represent callback methods you can implement to perform operations when the Activity moves between states. The colored ovals are major states the Activity can be in.
Crucial to know is that an Activity can be destroyed by the OS or the user at any time the activity loses focus. Hence you will need to provide the necessary code to save the state of your application when it is destroyed. Depending on the complexity of your activity, you probably don't need to implement all the lifecycle methods. However, it's important that you understand each one and implement those that ensure your app behaves the way users expect.
Some general guidelines are:
- Use
onCreate()to create and instantiate objects that your application will be using - Use
onResume()to start any services or code that needs to run while your activity is in the foreground - Use
onPause()to stop any services or code that does not need to run when your application is in the background - Use
onDestroy()to free up resources before your activity is destroyed